Showing posts with label photoshop tutorial. Show all posts

Tuesday, June 22, 2021

How to Maintain Illustrator Vector Artwork In Photoshop Editing Process

As a logo designer I often use Adobe Illustrator instead of Adobe Photoshop to work on my logo projects. But sometimes I need to add graphic effect on Photoshop, for instance if I need to put perfect realistic gold effect on the text part of a logo, yet I also need to make the shapes resizable. I don't say that Adobe Illustrator won't allow me to add gold effect, but Photoshop has more enhanced tools to make realistic gold effect. Then in this case, to continue the editing process, to use Photoshop is the best option. 

But how you would be sure if you'll get your Illustrator vector shapes back after the Photoshop editing stage?

Here's the tutorial steps of how to maintain the Illustrator vector shapes: 

  1. Create the vector shapes on Illustrator.
  2. Copy the Illustrator vector shape and paste each vector shape as Photoshop shape layer on Photoshop then add some graphic effect.
  3. Save as EPS file on Photoshop and tick the include vector format option.
  4. Open the EPS file on Illustrator then save as AI file.
  5. Check if you get vector layers in the EPS file.

TIPS: 

Remember to select Paste as Shape Layer not as Smart Object, Pixels or Path when you paste Illustrator vector shape to Photoshop. This technique will maintain the shapes as vector if you plan to use the graphic in bigger size.  
As the additional information that I'd like to put weight is that Photoshop gives you four options to copy a vector shape from Illustrator to Photoshop. Here's a brief explanation of each option:

Paste Artwork Options in Photoshop 

  1. Paste as Smart Objects 
    This is a good choice when you need to copy an entire design, and it’s your best option if you might need to modify the source artwork later in Illustrator. 
  2. Paste as Pixels 
    Pasting in the layer as Pixels will allow Photoshop to treat it just like the artwork was created inside of Photoshop. The downside is that Warps and Transforms will not preserve the quality of the original artwork. They work just like they would a standard art layer in Photoshop. 
  3. Paste as Path
    This option will paste only the vector path for the shape copied. The artwork can then be edited using the Path tools in Photoshop. 
  4. Paste as Shape Layer 
    As with Paste as Path, this option also works best for individual shapes. A Shape Layer is essentially an editable Vector Mask over a field of a specified color. 


 RELATED ARTICLE RESOURCES:

Wednesday, July 4, 2018

How to Partially Color a Photo in Photoshop

Hello all!

If you want to know of how to partially color a photo, you can check this Photoshop tutorial, from Envira Gallery Blog.


You just need to duplicate layers, adjust the saturation and color range on one of the layers where you want the object to be colored aside of the black and white color for the rest of the area in the photo.
Select-inverse the colored object and delete, so you will see the background layer in black and white (greyscale) mode.

The result of this effect can be playful and dramatic for the main colored object in a photo.

Read Tutorial 


Wednesday, May 4, 2011

Photoshop Tutorial: How to Set the World on Fire


Mickel a developer & designer from Sweden has written a Photoshop special effects tutorial for PixelTango.

The effects are created from scratch with a bunch of filters.

Read the Source Tutorial

Thursday, July 1, 2010

Techniques to Create Cartoony Graphic Effect

No matter how you start it, either from raw sketch or a photo, creating a cartoon or comic illustration is always fun. Here are a short list compilation of various techniques to create it.


Read More

Saturday, February 13, 2010

How to Create Favicon using IconBuilder Filter in Photoshop

Everyone should have known what Favicon is and its significance. There are great numbers of online favicon generators and tutorials that explain how to create using various graphic tools or Photoshop. In a matter of branding and positioning, it is fairly important for websites to connect their readers with this small graphic called favicon.

Few weeks ago, I created a favicon for my web-portfolio project. The result wasn't that good because I got crisp edges when I barely resized it in as tiny as 16 x 16 pixels size.

While I kept trying, one of my good friend Vaughan Risher suggested me to try IconBuilder. Big thanks to Vaughan, because this Photoshop filter plugin has produced some very high quality favicon files and it is really worth to try.

Icon Builder

Read More


The result is pretty amazing. Here's how:

First of all, you have to download the IconBuilder Photoshop filter plugin for Windows. If you are a Mac user you can download IconBuilder for Macintosh.

To install IconBuilder for Windows, copy the entire contents of the IconBuilder 2.0 folder into the Photoshop plug-ins folder. By default, the path to the plug-ins folder is:

C:\Program Files\Adobe\Photoshop ##\Plug-Ins (where ## is the version number you are using.)

Launch your logo design file that you wish to appear on your website as favicon. If your logo PSD file is consist of multilayered graphic, you have to merge the layers before you go to the next step.

Photobucket

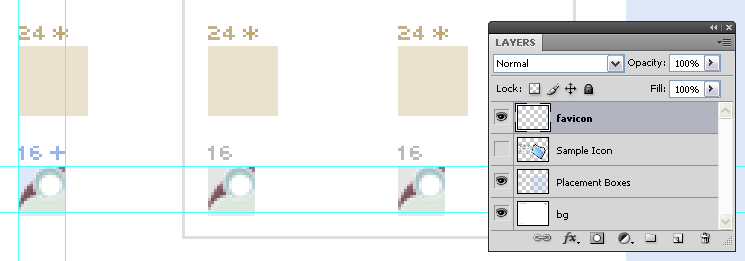
Inside the zipped file, you'll also find Windows.psd. Open the file in Photoshop and you will see some kind of grid framework to start with. There are boxes displayed in 4 rows which represent 4 different sizes of icons framework in 48px, 32px, 24px and 16px. Each row consist of 3 icon template boxes. Deactivate the visibility of Sample Icon layer.

Photobucket

Copy the merged logo to the Windows.psd file and resize it to fit the first 16 pixels box. In order to have perfect quality of placement, you can zoom-in your work canvas in 1200% magnification and use guides if necessary.

Photobucket

Duplicate the well set logo layer twice and put them on the two other boxes as careful as when you did it for first one. Merge those three identical layers whenever you're done.

Photobucket
Click to see bigger image

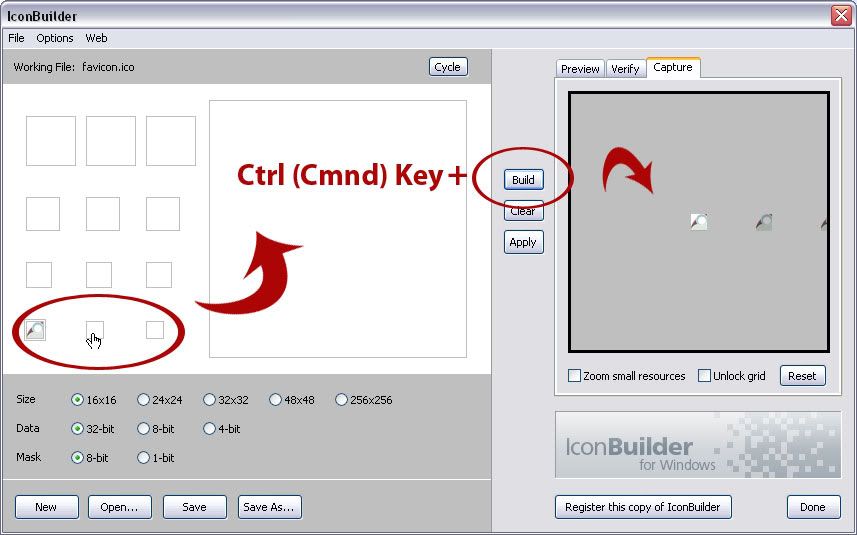
Go to the menu Filter > Iconfactory > Icon Builder to display the Icon Builder panel. You will see similar icon grid framework as seen in Windows.psd file at the left side of the panel. Click on the first icon template box. You will see the first box (with your tiny logo on it) in Window.psd is highlighted at the right side panel of Icon Builder. Hit Control (Command) key and Build button at the same time. Your logo will be displayed at the left panel soon after and do the same for the rest of icon template boxes.

Photobucket
Click to see bigger image

Click Save As button to produce favicon.ico file and upload it.

Put the following HTML code in between your ‹head› tags:

<!-- Favicon --><link href='http://yoursite.com/images/favicon.ico' rel='shortcut icon' type='image/x-icon'/>

Reload your browser and see if you like your new favicon now ;)

See it in action!

Photobucket

Are you using Mac? No worries, you can read a tutorial: how to create a favicon with IconBuilder in Macintosh posted by Benedikte Vanderweeën.

Related Post:


Thursday, August 27, 2009

Photoshop Pen Tool Resources

Pen Tool is a powerful tool in Photoshop that every designer should master. It is not difficult to understand how this tool work, but it would challenge most of us in its practical uses. Here are some resources links that may help you to figure out some Pen Tool tricks and its best practices for your creative design.
Feel free to drop another links in my comment box if you have another favorite Pen Tool resources to share. Thank you ;)


photoshop
Pen Tool graphic is designed by Markus Nielsen

Read More

Creative Tip: Adobe Pen Tool Cheatsheet by CreativeTechs.com
A simple PDF file cheatsheet that shows how easy Adobe’s Pen Tool to be used across Photoshop, Illustrator and InDesign (CS2/CS3) .


Photoshop Pathing: How To Use Photoshop Pen Tool by MakeUseOf.com
A very quick tutorial for pathing out a simple object from its background.


Making Selections With The Pen Tool by PhotoshopEssentials.com
It is a very good tutorial especially if you are a Photoshop beginners. Because it has lots of informative visual & textual explanations to create selection and therefore very easy to follow. The points of explanations covered:
  • Pen Tool & Path introduction
  • Turning A Path Into A Selection
  • Handle Directions Control
  • Drawing A Curve
  • Moving An Anchor Point
  • Combining Straight Paths With Curves
  • Practical example of how to select an object with curves


Photoshop’s Pen Tool: The Comprehensive Guide
by PSD.tutsplus.com
A very comprehensive tutorial that has many visual examples, tips, best practices and instructions about Pen Tool. You'll find explanations of functions, keyboard shortcuts, cursors, mouse & keyboard controls and option to use Pen Tool. The tutorial also provides you the downloadable Pen Tool Exercise file so you can follow the guides to create precise paths, using the hints and shortcuts covered in this article.


Photoshop Pen Tool Guide by Tutorial9.net
It is a well explained basic Peen Tool tutorial. The tutorial shows you how to create simple shapes with the help of Grid and snapping in your work canvas.


How to use Photoshop's Pen Tool by MelissaClifton.com
In the end you'll learn how to cut out an image with the pen tool and then creating custom shapes from the work path.

Tuesday, November 18, 2008

»» Photoshop Icons - Part 5

Are you searching for cool icons? Do you wanna know how to do it? Then fine I will list out some of the cool icon tutorials, just check this out and make use of it.

1. Vista Firewall
As we all know this is the Vista firewall icon, just looking like a shield right? Try to make it as your own.
2. Statistics Icon
This is such a wonderful icon, because the glossy effect of the icon is really awesome and at the same time the corners of the icon is really good.
3. Mac Os X Mail Icon Style
Such a beautiful one to see. The stamp like look is superb and nice too. Just check it out this cool icon....

4. Traffic Cone Icon
You all know about this right? Are you trying to make it of your own? Then try this tutorial out, it is very simple and cool too...


Thursday, October 23, 2008

»» Useful Photoshop Tutorials - Part 4

In this post I am going to share some links with you all, which I have found out across the web. These tutorials will really help the beginners a lot to know much about the Photoshop. Just check this out and try it out and do something useful through it....

Sunday, October 19, 2008

»» Beauty Retouching Photoshop Tutorials

Do you all willing to learn how to do beauty retouching in photos and how to make it more beautiful and attractive? Then fine here in this post I am going to list out some beauty retouching tutorials using Photoshop. Make use of this...

1.
Model Beauty

2. Pure Perfection


3. Phoenix Hair Effect


4. Retouching for Beginners

Thursday, October 9, 2008

»» Photoshop Tutorials Effects

1. Lighting effects in Photoshop CS2s

2.
Cruise Ship Cutaway

3. Magic light streak wallpaper

4. Magic Lighting Effect

Glow or Neon Effect of fonts in Photoshop

Do you want to know how to get a Neon or Glow effect in Photoshop for fonts? Check this post.....

1. Create new file with 72 PPI and white background. Type the text using black color with thin font.

2. Layer > Flatten Image

3. Image > Adjust > Invert


4.
Filter > Blur > Guassian blur (Radius 2.0)


5. Filter > Stylize > Solarize


6.
Image > Adjust > Auto Levels


7. Image > Adjust > Hue Saturation

Click Colorize

Drag the Saturation slider to 100


Try it out.....


Saturday, September 27, 2008

»» Text Effect Tutorials using Photoshop - Part 2

1. Reflective Liquid Type
Tutorials on creating metal type abound online, as do variations on simple liquid effects. Most are fairly short, offering a good foundation for the reader on how certain effects are achieved but fail to take that extra step (or few steps) to make the piece really shine. Once you have an idea of how different techniques fit together in a piece, it is fairly easy to combine, say, the process to create metal and the process to create liquid to create something that exists in both sides of the FX map.

2. Layered Glowing Text Effect
In this tutorial, we will create this effect using very basic Photoshop tools and layering effects. This tutorial is simple enough for a beginner to understand, but I should warn you that in this tutorial there ends up being over 60 active text layers, which will require a heavy use of your computer's memory. Let's jump into this tutorial and layer some glowing text.

3. Graffiti with Photoshop
In this tutorial we will see about the text effects using the real object...


4. Spectacular Grass Text Effect in Photoshop
Ever wanted to make text out of grass? Well with Photoshop you can. In this tutorial we'll create a rather cool-looking grass-text effect using a photo of grass, the Pen Tool and a bit of patience.


Featured Post

Monster Illustration Vectors that Work

Not all monsters are scary and we can apply them in a design composition or illustration. You may want to search bunch of new created monst...